 Skip to content


Tape Transformation - Fusion Side Table Makeover

|
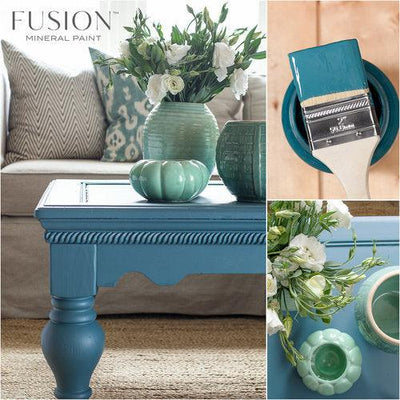
Last weekend was time for another family furniture makeover. This time we helped our eldest daughter transform a wooden side table, with a geometric design. We often find in our family, who are now all grown up and live over 4 houses, that we have a mix and match of furniture swapped between us all! But all the houses are styled differently, and what we love in our french country style home doesn't always suit a bohemian style. This was the case with this side table, so to create a crossover piece we have used a geometric design to pull together an eclectic table. Theres a few tips along the way with this one. Okay so lets begin: Supplies: 1. A piece of furniture, a table or anything with a flat surface big enough to create a taped out design. 2. Cleaning supplies - Sugar soap and a J cloth 3. Fusion Paint - We used Casement 4. A Flat Brush 5. Fusion Tough Coat 6. Tape! A good quality decorators tape is important to ensure sharp lines 7. Scissors 8. A rular and Pencil 9. A bit of patience, theres a bit of drying time for this one! We first wanted to choose a pattern for the table top, something bold, but also easy to create with the straight lines of tape. We chose a cross-over design, which allowed us to keep a border of the woods natural colour and grain. |

|
We started by washing the table with a damp cloth and sugar soap, to remove any dirt, and mildew. We then painted the legs, we gave them two coats. No distressing for this one as we wanted a solid finish to compliment the table top. Once all dry we used Fusion Tough coat over the whole table. We did this to keep it uniform as the table top design needed the tough coat for durability. Once all dry it was on to the fun part: we taped out the design. We split it into two parts, the square border and the middle diagonals. However we realised it was hard to keep it uniform in two stages and we were left with an overlap, so Tip: Tape off the whole design, before applying any paint! Using Scissors, a ruler and the pencil was the key to creating a perfectly proportioned pattern. We used a 1/2 inch tape, and took its width for granted, keeping all of the taped off areas the width of the tape. Once the tape was applied we pressed it down firmly and evenly, paying attention to the edges of the tape to prevent any leakage. Tip: Regular masking tape can be a bit risky, especially in warm spaces as it peels during the painting and drying process, causing messy edges. Its worth getting a better tape for the satisfaction of crisp results. We applied two layers of paint, waiting 2hrs in-between each coat for the paint to be touch dry. We used a 1inch brush to help us keep it neat and in between the lines! After leaving it for 4hrs to be completely dry... we peeled away the tape, and were left with a lovely geometric table top. Tip: Follow the paints drying times. The drying time that we can usually be impatient with, is important for this technique, as if you peel away the tape to early you may be left with some peeled or cracked edges. Patience is definitely a virtue for this make over!
|

|
To Finish we gave the table top another layer of Fusion Tough Coat, to keep it protected from the coffee cups and wine glasses that are sure to sit on it. We were so pleased with the results and it suits our daughters living room perfectly, a subtle mix of old and new. |

We love to see what you have all been up to, so please do send us your project photos on our facebook project group, or tag us on instagram @vintageatticsevenoaks


From the blog
View all


@vintageatticsevenoaks
follow us on instagram to see our latest updates
